Timers let you track time in real time. You can run multiple timers simultaneously — for example, one for a client meeting and another for administrative work.
From the Dashboard
- Tap Track Time on the Dashboard.
- The New Time Entry screen opens with a timer display at the top showing 00:00:00 and three buttons: Start (green), Stop (red), and Reset (gray).
- Fill in the required fields (marked with a red asterisk): Date, Client - Project, and Activity.
- Optionally add a Description and Internal Description (up to 1,000 characters). The Internal Description is for notes visible only to your team, not on invoices.
- Set the Billable Type (Hourly or Flat Fee) and Type (Standard or Overtime).
- Tap Start to begin the timer.
The timer counts up in real time. You can leave this screen and the timer continues running in the background. The clock icon in the top-right corner of the Dashboard will update its badge count to reflect the number of active timers.
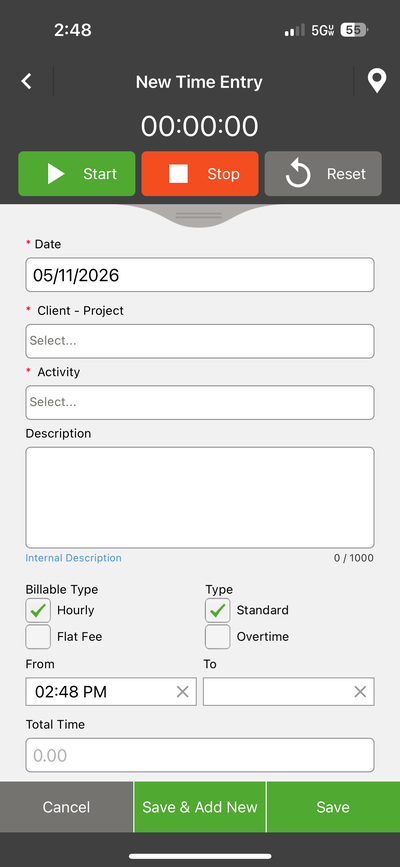
New Time Entry screen with timer controls (Timer mode)
Timer Fields on the New Time Entry Screen
Field
Description
Date
Defaults to today. Tap to select a different date.
Client - Project
Required. Select from the dropdown of clients and their associated projects.
Activity
Required. The type of work being performed (for example, Meeting, Development, Research).
Description
Optional. Describe the work. This text may appear on invoices.
Internal Description
Optional. Internal notes that do not appear on invoices. Up to 1,000 characters.
Billable Type
Hourly or Flat Fee. Defaults based on your account settings.
Type
Standard or Overtime.
From / To
The start and end times. "From" is set automatically when you tap Start. "To" is set when you tap Stop.
Total Time
Calculated automatically from the From and To times.
GPS: If GPS tracking is enabled, you will see a location pin icon in the top-right corner of the New Time Entry screen. Your coordinates are captured when you start and stop the timer.